Introduction
Copper and its alloys (brass, bronze) are commonly analyzed materials in metallography. Common examples include electrolytic tough pitch copper (C11000), cartridge brass (C26000), and various bronze alloys. Proper preparation is essential to reveal the true microstructure without introducing artifacts such as deformation, scratches, smearing, or contamination. This guide will walk you through the complete preparation process.
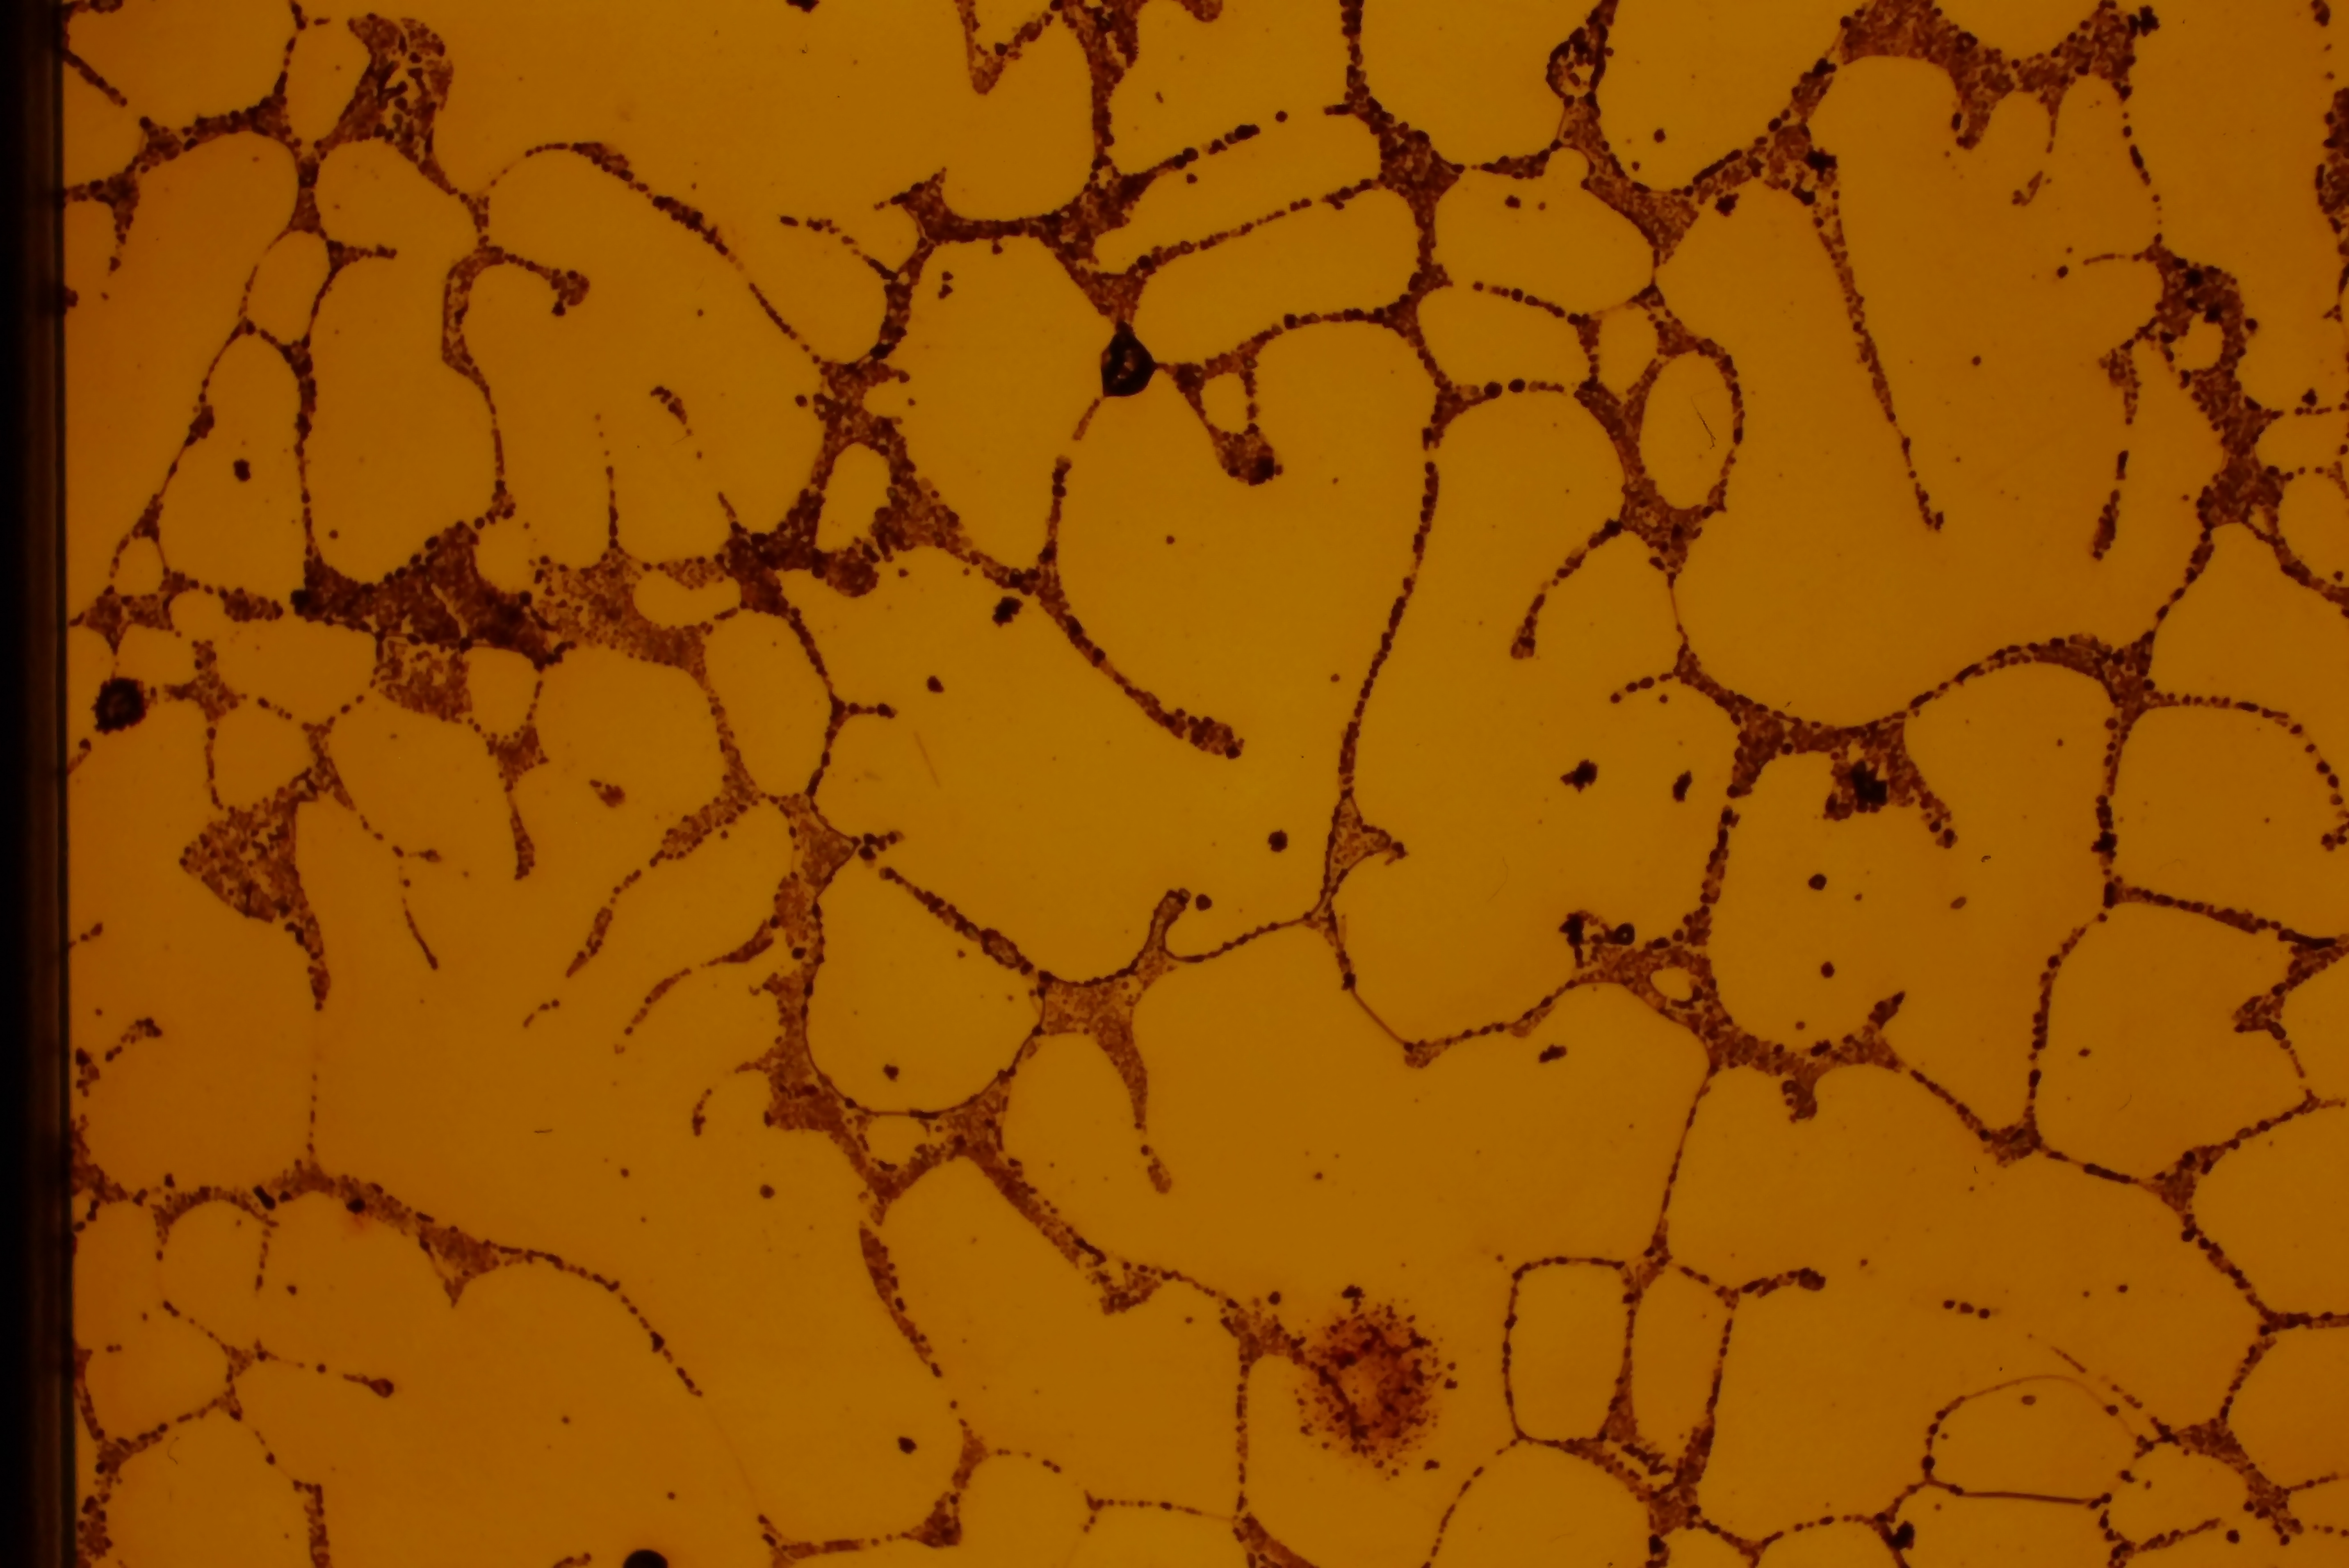
Tough pitch copper (C11000), etched with equal parts NH₄OH and 3% H₂O₂, 200X magnification
Copper alloys can be challenging due to their softness and tendency to deform and smear easily. The key is to use appropriate abrasives, maintain light pressure throughout the process, and avoid over-polishing which can introduce relief and smearing. Different copper alloys may require slight variations in technique. For example, softer alloys like electrolytic tough-pitch copper (C11000) require extra care to prevent smearing, while harder alloys like beryllium copper (C17200) can tolerate slightly higher pressures during preparation.
Two characteristics of copper metallography drive most of the technique decisions on this page:
- Oxide inclusions can be dislodged during preparation, causing surface scratching that becomes more apparent after etching. Don §11.1.2 identifies this as the core preparation challenge. Mitigations: alumina grinding papers rather than SiC at the plane-grinding step (no SiC embedding in the soft surface), and polycrystalline diamond for the rough polish.
- Lead inclusions are destroyed by most etchants. Free-cutting brass (C36000), leaded bronzes (CuSn8Pb), and other Pb-bearing alloys leave behind black voids where the lead used to be if you etch first. Any micrograph that documents lead size, distribution, or volume fraction must be taken in the as-polished condition before etching.
Pick the final polish to match your goal
The first four steps of the procedure (1200 ALO → 800 SiC → 1200 SiC → 1 µm DIAMAT on ATLANTIS) are the same for all copper work. The final polish has two paths:
- Standard final (0.05 µm Nanometer alumina on NAPPAD, Don §11.1.2): Use for routine work like grain size, twin density, phase identification, hardness testing, and general microstructure documentation. Fast, clean, no chemical handling.
- Advanced final (0.05 µm colloidal silica + chemical additive on MICROPAD, chemical-mechanical / "attack" polish): Use when you need a truly scratch-free surface for color etching (Klemm's I/II/III, Beraha's), for cold-worked pure copper where fine scratches reappear after etching, for Tough-Pitch Cu2O retention, or for quantitative inclusion analysis. Slower and requires fresh chemistry, but reveals what the standard final cannot.
Vibratory polishing with colloidal silica is an excellent supplement to either path when image-analysis-grade flatness is required.
Leaded alloys, sequence matters: For C36000, CuZn40Pb2, CuSn8Pb, and similar leaded alloys, capture all required as-polished imagery (lead volume fraction, distribution, inclusion sizing) first. Then etch a second representative section, or accept that the etched view will show only voids where lead used to be. Pure lead appears grey-blue in brightfield; etched-out lead voids appear black.
Sectioning
When sectioning copper and copper alloy samples, use a slow cutting speed to minimize heat generation and deformation. Copper's softness requires careful handling to prevent deformation and smearing. This is especially important for pure copper grades like C11000 and softer brass alloys like C26000 cartridge brass.

MAX-E abrasive cut-off blades designed for soft non-ferrous materials like copper and copper alloys. Thin blades (0.5-1.0 mm) minimize heat generation and deformation.
- Use MAX-E series blades (designed for soft non-ferrous materials like copper and copper alloys)
- Use a thin abrasive cut-off wheel (0.5-1.0 mm thickness)
- Apply steady, light pressure to avoid deformation
- Use adequate coolant to prevent overheating and smearing
- Allow the wheel to do the cutting - avoid forcing
- Consider using a slower feed rate than for harder materials
For more information on sectioning blades, visit our MAX-E Abrasive Cut-Off Blades collection.
Mounting
Mounting provides edge retention and easier handling. For copper and copper alloys, compression mounting with phenolic or epoxy resins works well. Castable mounting with epoxy is also suitable and avoids potential heat-related issues that could affect the microstructure.
Compression Mounting
- Clean the sample thoroughly to remove cutting fluid and debris
- Place sample in mounting press with appropriate resin
- Apply pressure: 3000-4000 psi for phenolic, 2000-3000 psi for epoxy
- Heat to 150-180°C and hold for 5-8 minutes
- Cool under pressure to room temperature
Castable Mounting (also known as Cold Mounting)
- Clean and dry the sample
- Place in mounting cup with epoxy resin
- Allow to cure at room temperature (typically 4-8 hours)
Castable mounting avoids heat that could affect copper microstructure.
For more information on mounting equipment, visit our Compression Mounting Equipment page.
Grinding
Per Don §11.1.2, copper grinding uses aluminum-oxide (ALO) paper at the plane-grinding step rather than silicon carbide. ALO does not embed into soft copper surfaces the way SiC does, which is the primary source of post-polish scratching after etching. The procedure is identical to Don §11.1.1 for aluminum; the same softness-and-oxide-pull-out logic applies.

Progressive grinding for copper: aluminum-oxide (ALO) paper for plane grinding, then fine SiC papers at 800 grit (P2400) and 1200 grit (P4000). Rotate the sample 90° between steps.
Grinding Sequence
- 600 grit (P1200) ALO paper: Water lubricant, 5-10 lb (22-45 N), 100/100 rpm head/base, grind until the sample is plane.
- 800 grit (P2400) SiC paper: Water lubricant, 5-10 lb, 100/100 rpm, 1 minute.
- 1200 grit (P4000) SiC paper: Water lubricant, 5-10 lb, 100/100 rpm, 1 minute.
Important: Rotate the sample 90° between each grit to ensure complete removal of scratches from the previous step. Keep force in the 5-10 lb range. Heavy pressure on copper produces deep subsurface deformation that no amount of polishing will fully remove; it returns as scratches that reappear after each etch.
For more information on grinding supplies, visit our Abrasive Grinding Papers collection.
Polishing
Per Don §11.1.2, copper polishing is a single 1 µm DIAMAT diamond step followed by a 0.05 µm Nanometer alumina final, the same sequence used for aluminum (§11.1.1). The combination of alumina grinding papers, polycrystalline diamond for the rough polish, and polycrystalline alumina for the final polish minimizes oxide pull-out, which is the dominant copper preparation failure.
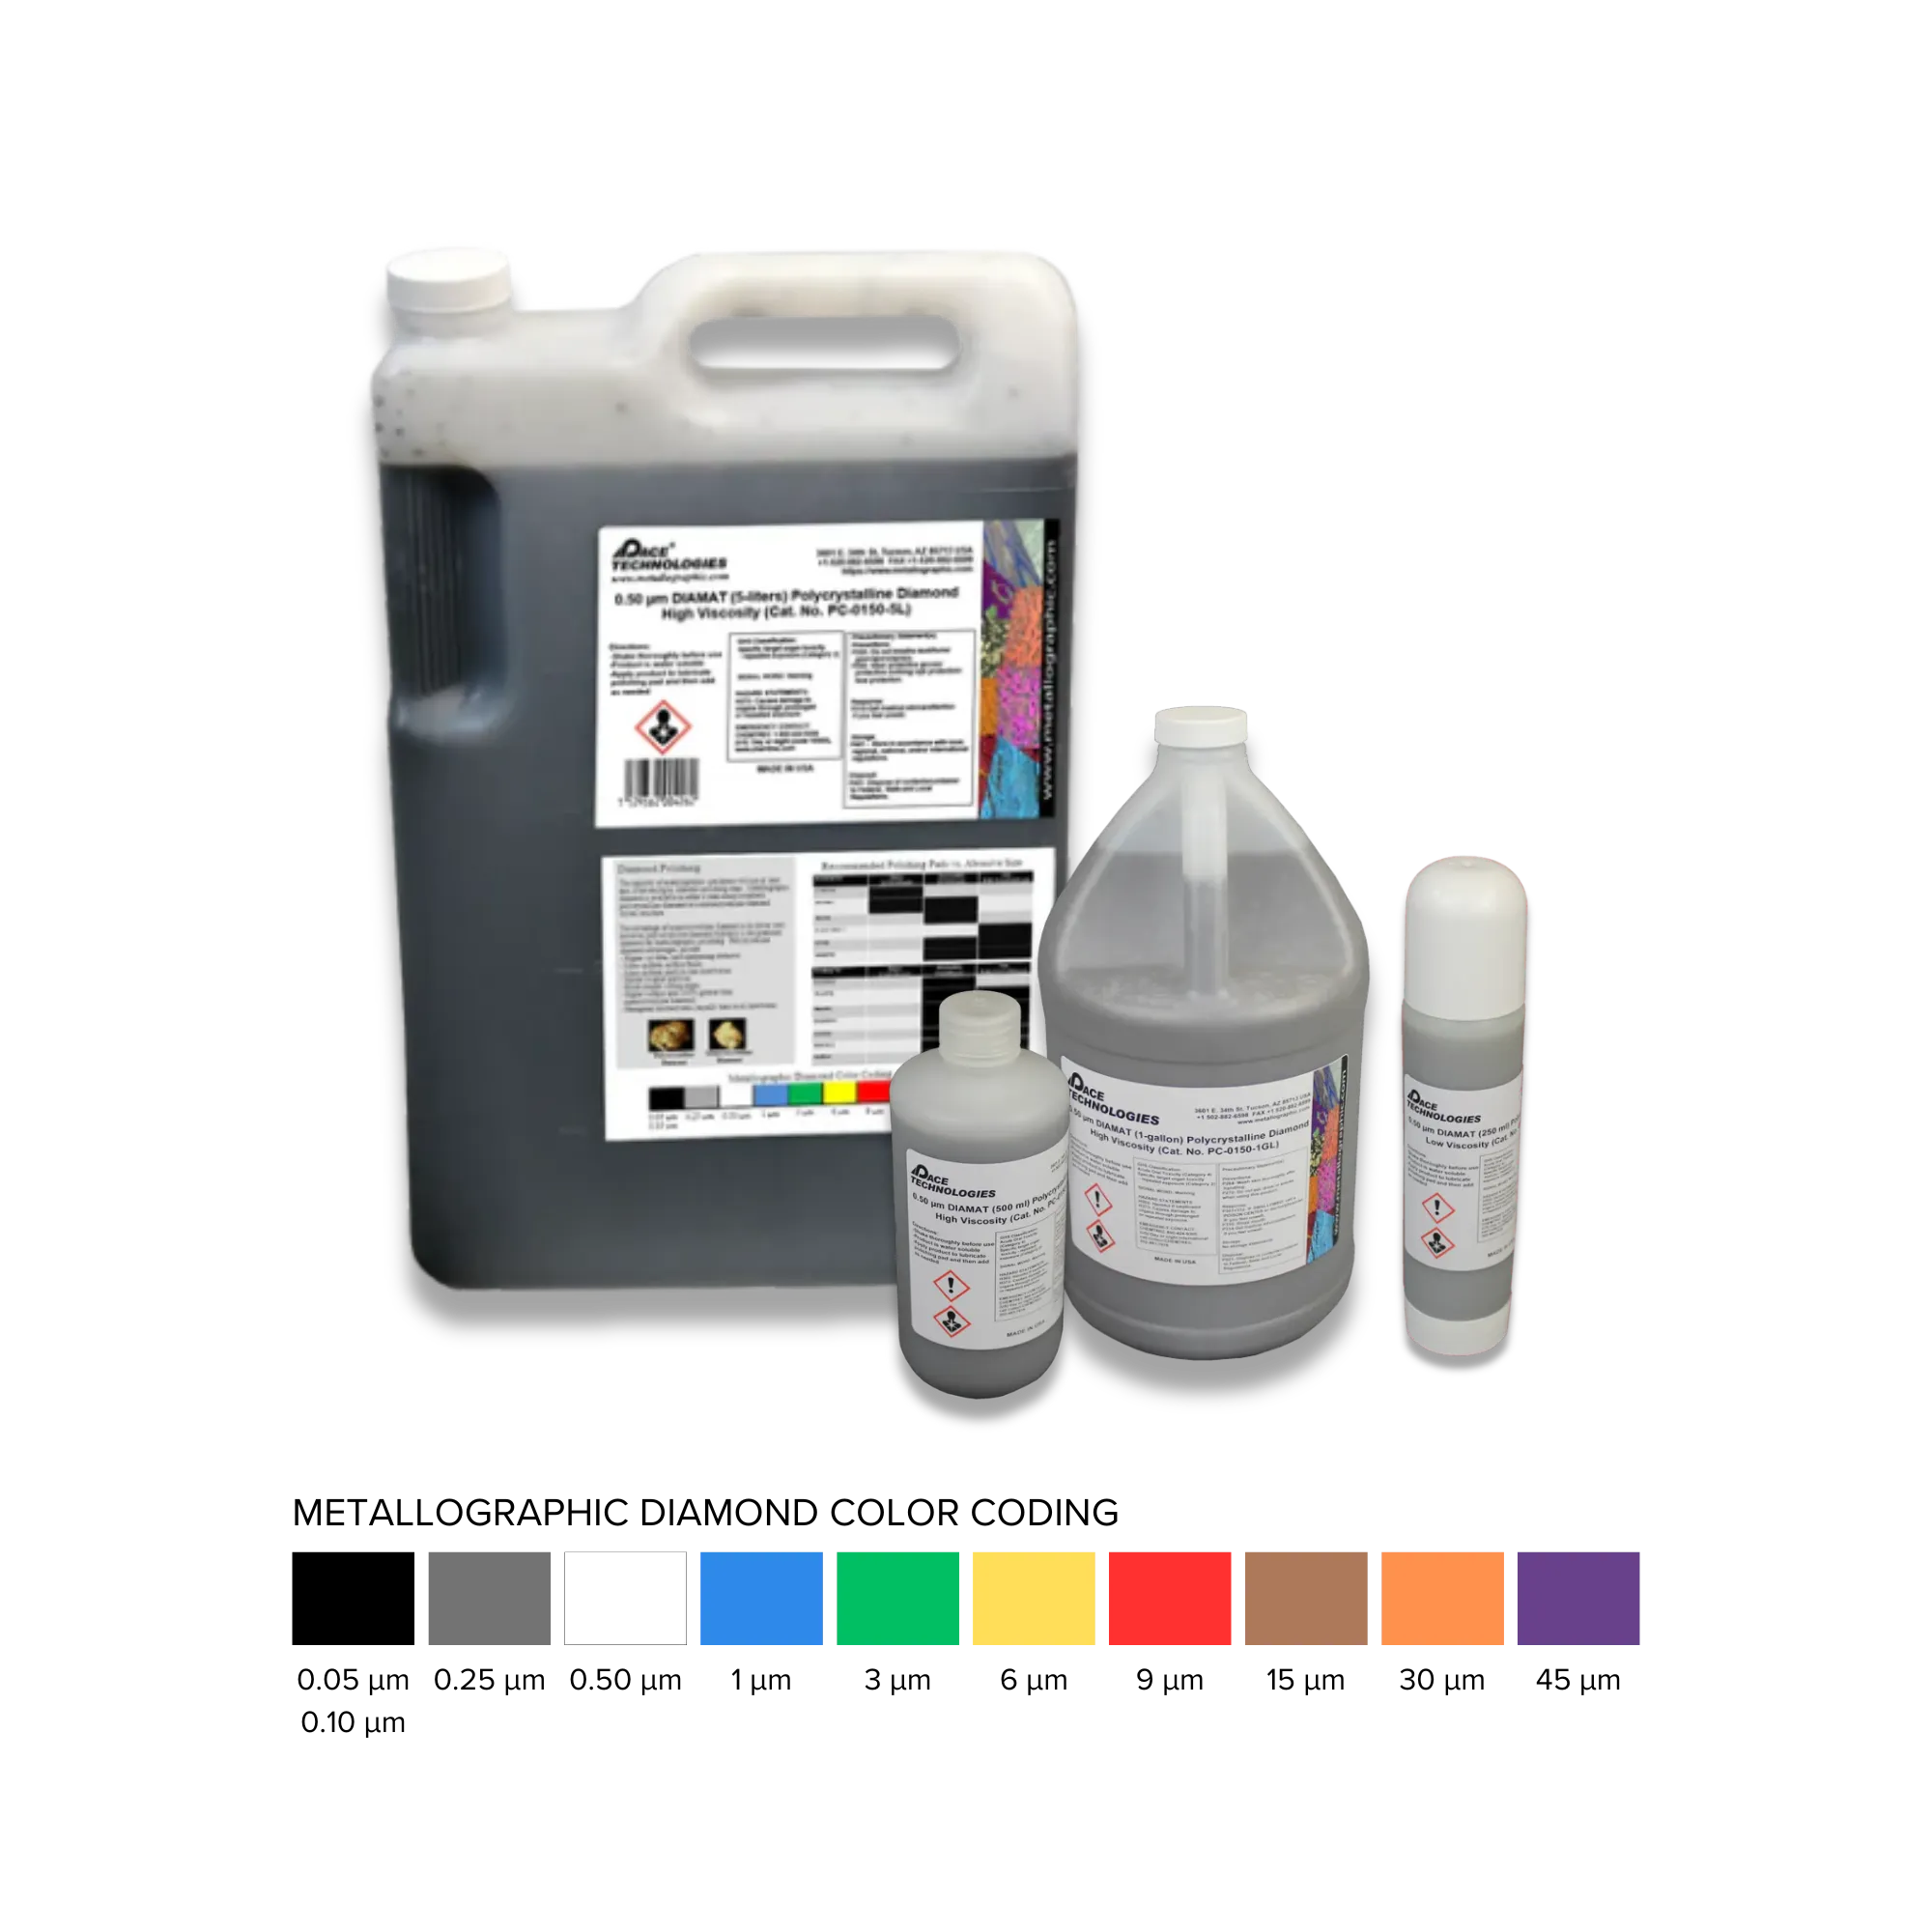
DIAMAT polycrystalline diamond suspension on ATLANTIS polishing pad with DIALUBE Purple Extender.
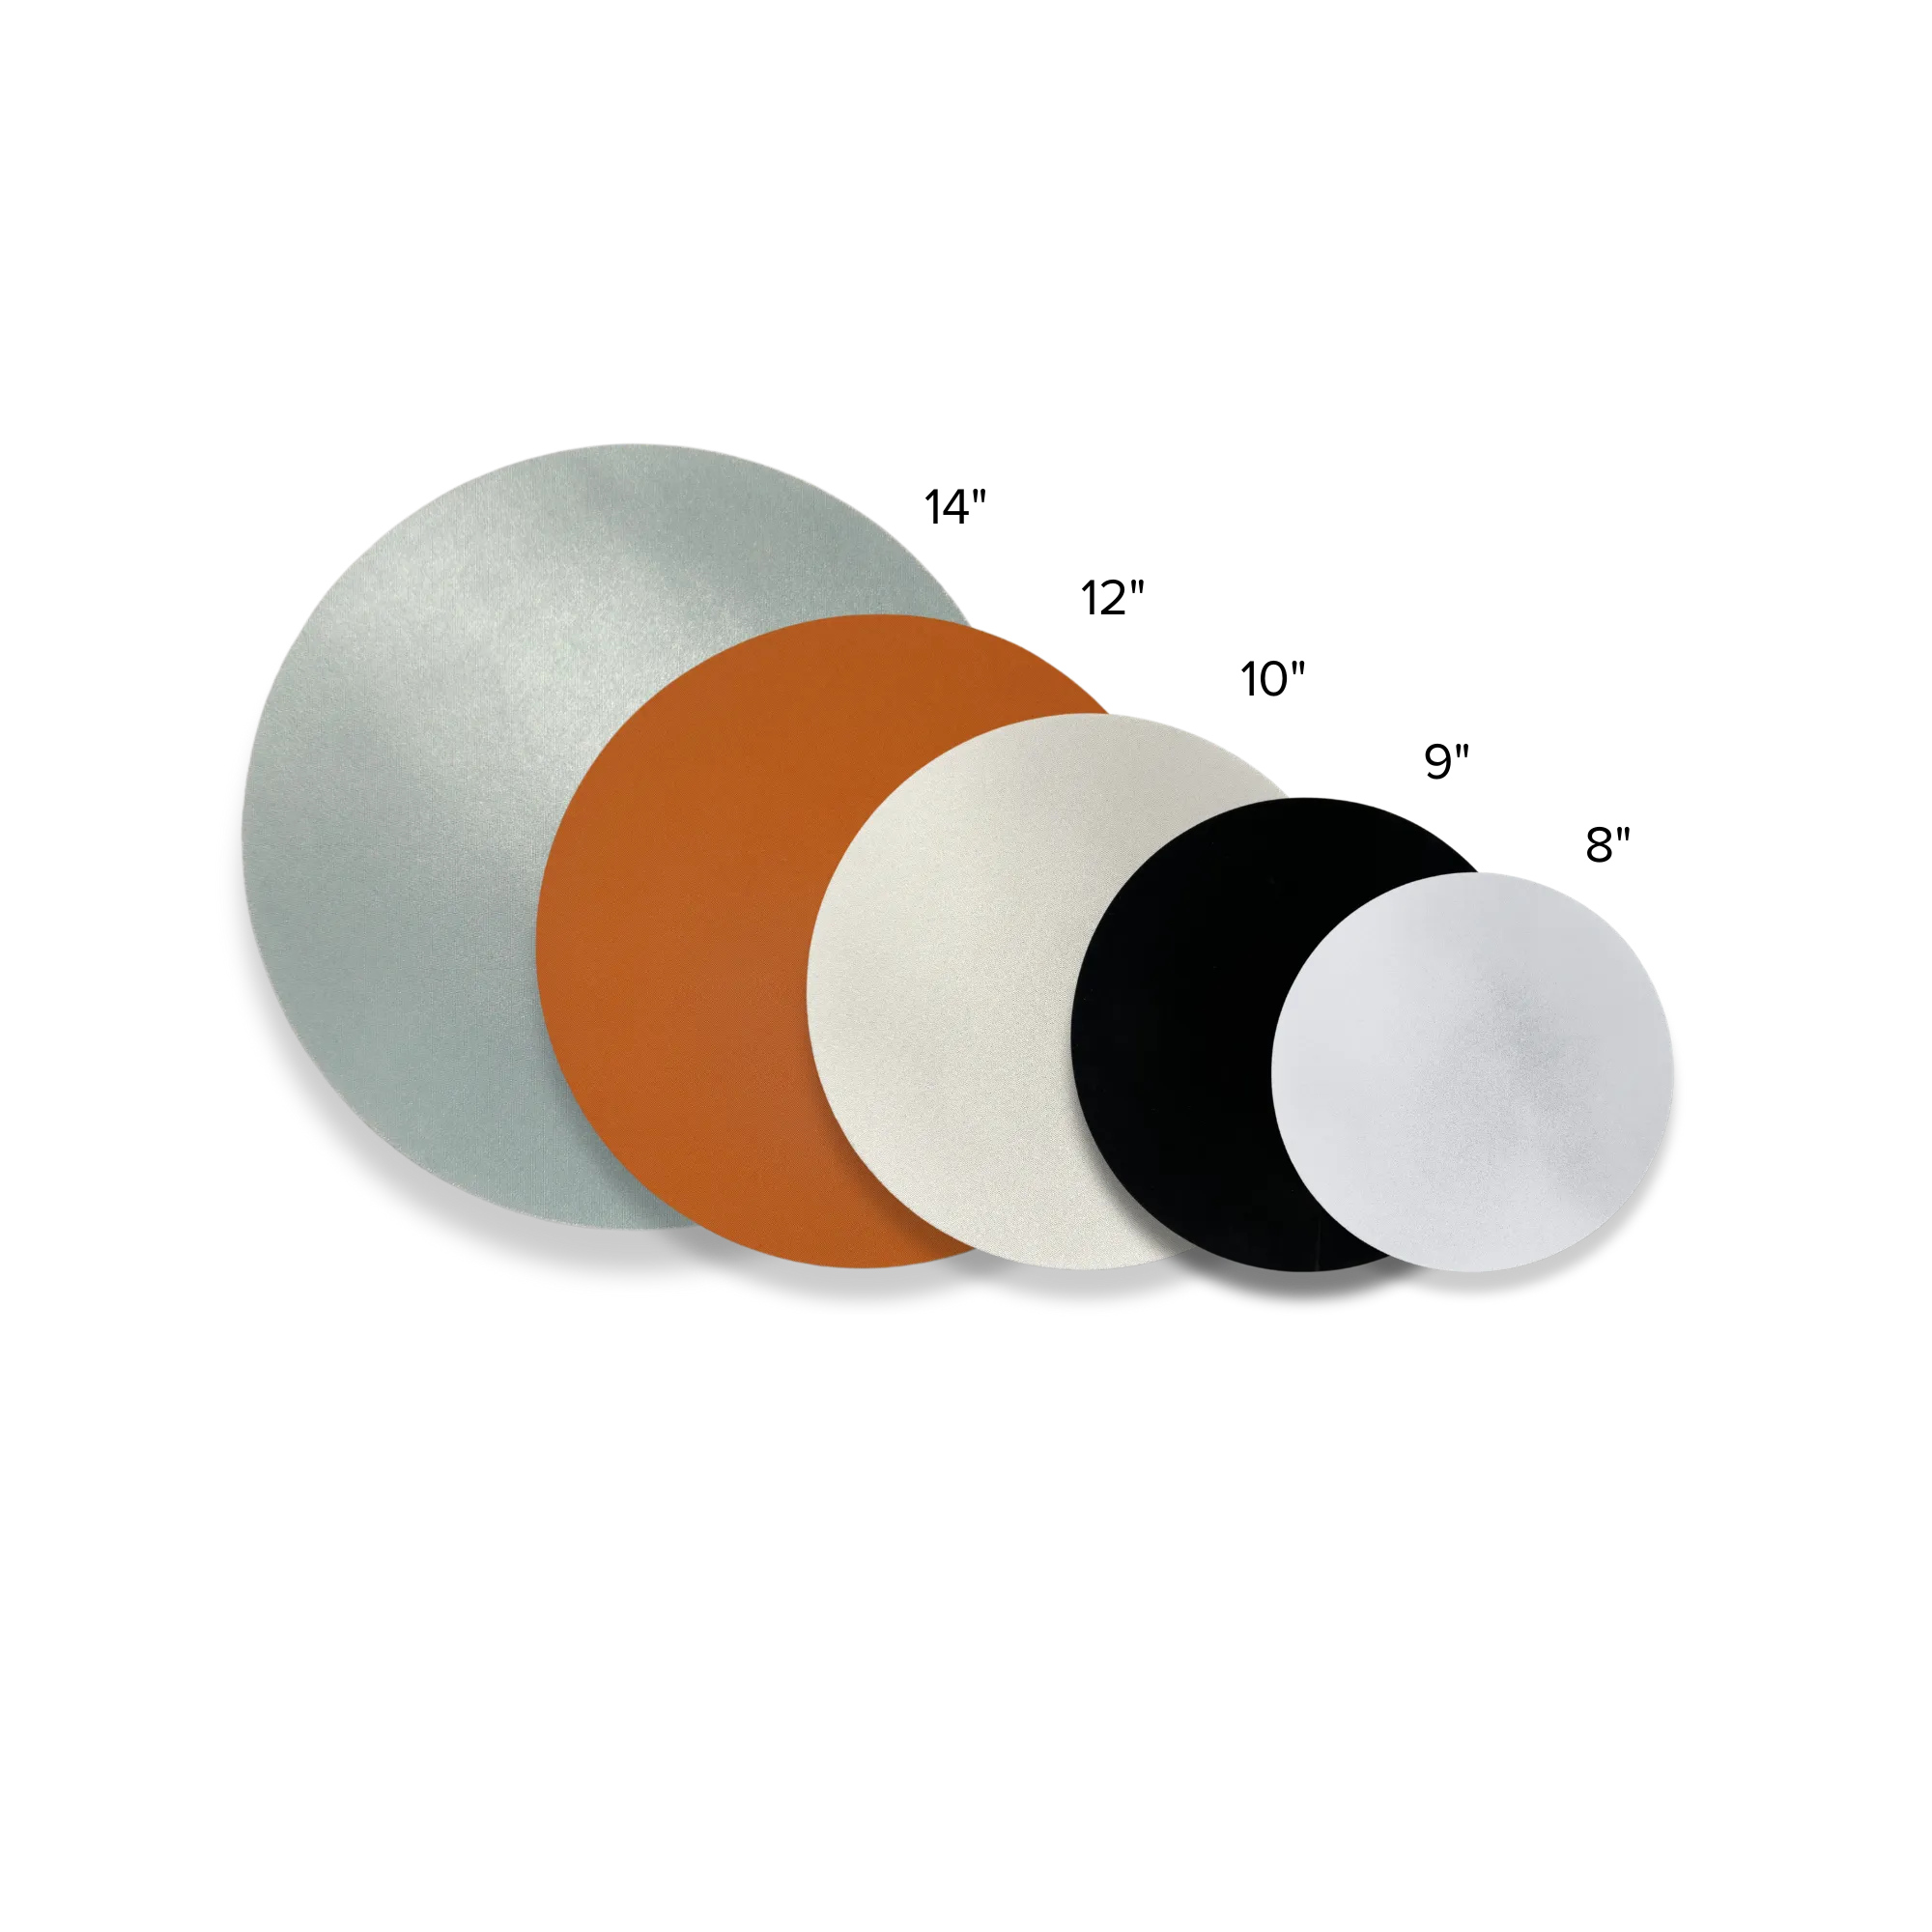
ATLANTIS pad for the 1 µm DIAMAT rough polish; NAPPAD for the final 0.05 µm Nanometer alumina polish.
Rough Polishing (shared by both finish paths)
- 1 µm DIAMAT diamond on ATLANTIS polishing pad: DIALUBE Purple Extender lubricant, 5-10 lb (22-45 N), 100/100 rpm head/base, 2 minutes.
Standard Final: 0.05 µm Nanometer alumina on NAPPAD
Use for: Routine grain size, twin density, phase identification, hardness testing, general microstructure documentation. This is Don §11.1.2's primary recipe: fast, clean, no chemical handling.
- 0.05 µm Nanometer alumina on NAPPAD polishing pad: 5-10 lb, 100/100 rpm, 1 minute.
- Rinse thoroughly with water, then ethanol; dry with compressed air.
Pad Map & Parameters Summary
| Step | Surface | Abrasive / Lubricant | Force / sample | Speed (head/base) | Time |
|---|---|---|---|---|---|
| Plane grind | 600 grit (P1200) ALO paper | Water | 5-10 lb | 100/100 rpm | Until plane |
| Fine grind | 800 grit (P2400) SiC paper | Water | 5-10 lb | 100/100 rpm | 1 min |
| Fine grind | 1200 grit (P4000) SiC paper | Water | 5-10 lb | 100/100 rpm | 1 min |
| Rough polish | ATLANTIS | 1 µm DIAMAT + DIALUBE Purple | 5-10 lb | 100/100 rpm | 2 min |
| Final polish | NAPPAD | 0.05 µm Nanometer alumina | 5-10 lb | 100/100 rpm | 1 min |
Important: Keep force light (5-10 lb) and check the surface between steps. Over-polishing introduces relief around second-phase particles and inclusions. Complementary rotation throughout (head and base turning in the same direction).
Bronze Variant: Add a 360 Grit (P500) ALO Pre-Step
Per Don §11.1.4, bronze preparation adds a single coarser ALO step at the start of the procedure. The rest is identical to the copper/brass procedure above.
- 360 grit (P500) ALO paper: Water, 5-10 lb, 100/100 rpm, 1 minute.
- 600 grit (P1200) ALO paper: Water, 5-10 lb, 100/100 rpm, until plane.
- Continue with 800 grit (P2400) SiC, 1200 grit (P4000) SiC, 1 µm DIAMAT on ATLANTIS, 0.05 µm Nanometer alumina on NAPPAD as above.
The extra 360 grit (P500) ALO step at the start handles the somewhat higher hardness of bronzes (Cu-Sn, Mn-Al bronze, Ni-Fe bronze) compared to pure copper or brass without changing the rest of the procedure. The 1 µm DIAMAT step stays the same; no extra diamond step is needed for bronzes.
For more information on polishing supplies, visit our Diamond Abrasives and Polishing Pads collections.
Advanced Final: Chemical-Mechanical (Attack) Polish on MICROPAD
Use for: Samples destined for color etching (Klemm's I/II/III, Beraha's PbS), where any residual scratch is highlighted by the tint; cold-worked pure copper where fine scratches reappear after etching; Tough-Pitch copper Cu2O retention (the oxide is difficult to retain with mechanical polishing alone); quantitative inclusion analysis where smeared matrix metal must be lifted from inclusion boundaries.
This finish substitutes for the Nanometer-alumina-on-NAPPAD step. The chemo-mechanical action of colloidal silica with a mild oxidizing additive does what mechanical polishing alone cannot. The technique is documented in Vander Voort and the Struers application note for copper; both are cited in Additional Reading.
Choose the additive by alloy type:
- Pure copper (C11000, OFE, OFHC, Tough-Pitch): 0.05 µm colloidal silica + 1% aqueous ferric (III) nitrate, dropped onto the cloth.
- Copper alloys (brasses, bronzes): 96 mL colloidal silica + 2 mL NH4OH (25%) + 2 mL H2O2 (3%), mixed fresh.
- Apply the silica-plus-additive mixture to MICROPAD (high-napped final). ATLANTIS is acceptable if MICROPAD is unavailable but produces slightly more relief.
- Polish for 1 minute at light pressure (1-2 lbf per sample), then inspect under the microscope.
- Continue in 1-minute cycles until the surface is scratch-free. Pure copper often needs 3-5 minutes total; harder alloys are faster.
- Switch to plain water for the last 20-30 seconds to flush silica from the sample and cloth. Never let colloidal silica dry on the surface.
- Rinse with water, then ethanol; dry with compressed air. Do not wipe.
Vibratory Polishing (Optional)
Vibratory polishing with colloidal silica for 1-2 hours produces the flattest, most scratch-free surfaces, particularly valuable for color etching work, where any residual scratch is highlighted by the tint. Use after the standard rotary polish rather than in place of it.
Electrolytic Polishing (Alternative for Pure Cu and α-brass)
For pure copper and α-brass wrought alloys, electrolytic polishing is an alternative to the alumina final step. Pre-grind to a very fine SiC finish (2400 grit / P2400 or 4000 grit / P4000) first. Electrolytic polishing is not recommended for cast alloys (different phases polish at different rates) or for leaded alloys (lead inclusions pull out and appear larger and more numerous than they really are).
Etching
Etching reveals the microstructure by selectively attacking grain boundaries and phases. The choice of etchant depends on the copper alloy and what features you want to reveal: grain size and twins, α/β phase distinction, cold-work distribution, or coring in cast bronzes. Black-and-white etchants cover routine grain-boundary and phase-identification work; color (tint) etchants are essential for cold-worked specimens and for revealing fine compositional differences in cast alloys.

70-30 rolled brass (C26000) at 200X magnification, showing grain boundaries and annealing twins characteristic of copper alloys
Standard Black-and-White Etchants
- Ammonium hydroxide + hydrogen peroxide: Equal parts concentrated NH₄OH and 3% H₂O₂, optionally diluted with an equal part of water. The single most-used etchant for copper and its alloys. Reveals grain boundaries and twins. Must be prepared fresh; solution loses activity within minutes once mixed. Swab application; 5-30 seconds at room temperature.
- Nitric acid in water (50:50): 50 mL HNO₃ + 50 mL H₂O. Aggressive general etch for tough-pitch copper and brasses; reveals grain boundaries. Use a swab; 5-15 seconds. Watch for pitting on prolonged exposure.
- Ferric chloride in HCl: 100-120 mL water or ethanol + 20-50 mL HCl + 5-10 g FeCl₃ (concentration variable to suit the alloy). Reliable for most copper alloys including aluminum bronze and Cu-Ni. Swab or immerse; 5-30 seconds.
- Ammonium persulfate: 10 g (NH₄)₂S₂O₈ + 90 mL H₂O. Mild grain-area etch for pure copper, brass, and bronze. Prepare fresh; solution decomposes within 1-2 days. Swab; 5-45 seconds.
- Potassium dichromate: 2 g K₂Cr₂O₇ + 8 mL H₂SO₄ + 4 mL saturated NaCl + 100 mL H₂O. Good grain-boundary contrast in brass and bronze; particularly useful for aluminum bronze. Swab.
- Dichromate for tin bronze: 36 mL H₂SO₄ + 445 mL H₂O + 18 mL saturated NaCl + 8.9 g K₂Cr₂O₇. Specific to Cu-Sn alloys; reveals the α/δ structure.
Color (Tint) Etchants
Color etching reveals features that black-and-white etchants miss: cold-work distribution, partial recrystallization, slip lines, coring in cast bronzes, and α/β phase distinction in brasses. The Klemm reagents are the standard tint etchants for copper and its alloys. All Klemm reagents are immersion etches (not swab); immerse until the surface develops color.
- Klemm's I: 50 mL saturated aqueous sodium thiosulfate + 1 g potassium metabisulfite. General-purpose color etch for copper and most alloys; the broadest range of applicability.
- Klemm's II: 50 mL saturated aqueous sodium thiosulfate + 5 g potassium metabisulfite. Stronger than Klemm's I. Best choice for α-brass.
- Klemm's III: 5 mL saturated aqueous sodium thiosulfate + 45 mL water + 20 g potassium metabisulfite. Optimized for bronzes; gives strong color in Cu-Sn alloys and partially recrystallized structures.
- Beraha's lead sulfide (PbS) reagent: 1000 mL water + 240 g sodium thiosulfate + 30 g citric acid + 24 g lead acetate. Dissolve in the order given (citric acid is slow to dissolve), age 24 hours in a dark bottle, and store in darkness. Pour ~100 mL into a beaker for each use and discard; do not return liquid to the storage bottle. Specific for tinting α-phase in cast bronzes and brasses.
Cold-worked specimens: Heavily cold-worked copper and brass are very difficult to etch with the standard black-and-white reagents. The structure does not render sharply, and slip lines/partial recrystallization are nearly invisible. Use Klemm's I or III with a brief polarized-light examination plus a sensitive tint plate. The combination of color etch and polarized light is the standard approach for cold-worked copper analysis.
Leaded alloys, repeat the warning: All of the etchants above attack lead. If your alloy contains lead (C36000, CuZn40Pb2, CuSn8Pb), capture all lead-related imagery as-polished before etching. After etching, the lead inclusions will appear as black voids of approximately the right size and shape, but volume fraction and inclusion counts measured from etched images are unreliable.

Etching solutions and reagents for copper and copper alloys. Common black-and-white etchants include ammoniacal hydrogen peroxide, dilute nitric acid, ferric chloride/HCl, and ammonium persulfate; color etching is done with Klemm I/II/III or Beraha's PbS reagent. Etching time typically ranges from 5-45 seconds for black-and-white etchants, longer for color etches.
Etching Procedure
- Ensure sample is clean and dry; any residual colloidal silica will give a mottled etch.
- Apply by swab for black-and-white etchants (NH₄OH+H₂O₂, nitric, FeCl₃, persulfate); immerse for Klemm and Beraha color etches.
- Etch for 5-45 seconds, depending on etchant and alloy. Color etches develop over 30 seconds to several minutes; watch for surface color change and pull when contrast is established.
- Immediately rinse with water, then alcohol.
- Dry with compressed air. Do not wipe.
Tip: Start with shorter etching times (5-10 seconds for black-and-white etchants) and increase if needed. Over-etching can obscure fine details and create pitting. The ammonium hydroxide / hydrogen peroxide etch in particular must be mixed fresh; activity falls off within minutes. Klemm reagents keep for several weeks in a closed bottle and can be used until color development becomes sluggish.
For more information on etchants, visit our Etchants collection.
Troubleshooting
Common Issues and Solutions
- Fine scratches that won't polish out: First fix is to extend the 1 µm DIAMAT step (3-4 min) on a fresh ATLANTIS pad with lighter force. If scratches persist, the deformation came in during grinding; back up to 1200 grit SiC and re-run with lighter force. If you need a truly scratch-free surface (color etching prep, cold-worked pure Cu, Cu2O retention), switch the final polish from Nanometer alumina on NAPPAD to the advanced chemical-mechanical / attack-polish path on MICROPAD.
- Smearing: Too much pressure, or moving to a soft pad too early. Reduce force to 5-7 lb; verify pad stiffness matches abrasive size.
- Relief around second phases or inclusions: Over-polishing or too soft a pad. Reduce time at the 1 µm DIAMAT step. If using the advanced attack-polish final, reduce its duration.
- Embedded silica (bright spots in SEM, mottled etch): Only applies if you used the advanced (colloidal silica) final. Always rinse with plain water on the cloth for the last 20-30 seconds, and rinse the sample thoroughly afterward. The standard alumina-on-NAPPAD final does not have this problem.
- Contamination: Clean ultrasonically between steps. Soft copper picks up debris from prior abrasives readily.
- Deformation that reappears after each etch: Subsurface damage from coarse grinding. Return to the SiC progression with lighter pressure (5-6 lb), or switch to the advanced attack-polish final to chemically lift the residual deformation.
- Over-etching: Reduce time or dilute the etchant. Most black-and-white etchants for copper finish in 5-15 seconds.
- Pitting after etching: Stale etchant or excessive time. Mix fresh; the NH4OH+H2O2 etch in particular falls off within minutes.
- Poor grain boundary contrast in cold-worked samples: Standard etchants don't render cold-worked copper sharply. Switch to a Klemm color etch and view under polarized light. Use the advanced attack-polish final for these samples; tint etches highlight every residual scratch.
- Lead inclusions look wrong after etching: Expected; etchants attack lead. Image lead in the as-polished condition; the etched view shows voids, not inclusions.
Additional Reading
- Zipperian, D.C. Metallographic Handbook. PACE Technologies, Tucson, AZ. The house reference.
- Vander Voort, G.F. "Color Metallography of Copper." Advanced Materials & Processes, July 2000. The source for the contemporary diamond sequence and Klemm color etching practice used in this guide.
- Weidmann, E. and Guesnier, A. "Metallographic Preparation of Copper and Copper Alloys." Struers Application Notes. Particularly useful for the colloidal silica + NH₄OH + H₂O₂ attack-polish formula for copper alloys and the lead-inclusion warning.
- ASM Handbook, Vol. 9: Metallography and Microstructures. ASM International. Etchant compositions and copper-alloy phase identification.
- Petzow, G. Metallographic Etching, 2nd ed. ASM International. Comprehensive etchant reference including Klemm and Beraha formulations.
- ASTM E407 — Standard Practice for Microetching Metals and Alloys (copper and copper alloys section).
Explore More Procedures
Browse our comprehensive procedure guides for material-specific preparation methods and get personalized recommendations.